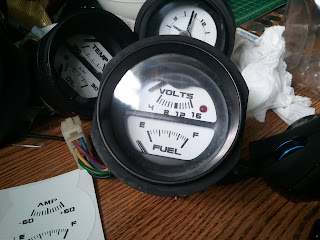
After nearly two weeks of waiting they came in, die-cut non-yellowing white gauge faces they are AWESOME quality.
They come over sized in certain areas so you need to cut them down, but they fit over the stock faces perfectly with a small amount of overlap to hide any placement mistakes.
Red bulbs wont be here for atleast 2 weeks, they're on the way from Bangkok
ONLY DO THIS PART IF YOU ARE CHANGING YOUR BULB COLOR
First thing you need to do is remove the green light bulb bubble covers, they gave the stock gauges a green tint when they were lit up, but because i am changing the bulb colors i don't need them anymore.

Take a screw driver and gently tap it with something, it'll pop right out, i took my gauge faces off before doing this so it fell right out of the bottom, if you don't.. well, good luck getting it out without damaging something.
First i did the tachometer, i forgot to take a picture of it when it was black but hopefully the speedo will give you an idea of what you need to do.
Completely take apart the gauge assembly, remove the needle, unscrew the original face and apply the vinyl.
This was the hardest part, that little needle sticking up didn't have a pre-cut hole, i pressed the vinyl down flat against the tip of the needle and made an X with my razor blade, i was able to push it down almost flat to the gauge.
After that, i pressed the razor blade against the base of the needle, and rotated the gauge around the blade to get a circular cut. After that it was just a matter of lining everything up just right.

Clock was the easiest, taking the needles off was a pain in the ass though.
If you haven't noticed yet, i painted my needles dark blue, the color will show much better in natural sunlight during the day, and at night when the gauge is lit up, it'll look black under the red light so its easier to see instead of the white needle on white face.

These were a pain in the ass, you have to almost completely disassemble them, they are two pieces (top and bottom) the vinyls come in one piece, so your cut needs to be perfectly straight. Don't worry about being precise on the gap because a black piece from the gauge bezel covers the center

I never took a before picture, so here is one from google

And the afters


